Set Up Time Synchronization on Ubuntu 20.04
This article will explain how to set up Time Synchronization on Ubuntu 20.04 in command line.
Accurate timekeeping is integral to modern software deployments. Without it, you may encounter data corruption, errors, and other issues that are difficult to debug. Time synchronization can help ensure your logs are being recorded in the correct order, and that database updates are appropriately applied.
Fortunately, Ubuntu 20.04 has time synchronization built-in and activated by default using systemd’s timesyncd service. In this article, you will practice some general time-related commands, verify that timesyncd is active, and install an alternate network time service.
Prerequisites
Before starting this tutorial, you will need an Ubuntu 20.04 server with a non-root, sudo-enabled user and a firewall, as described in this Ubuntu 20.04 server setup tutorial.
Steps to setup Time Synchronization on Ubuntu
To view the time on your server, you will use the command date. Any user can run this command to print out the date and time:
date
Typically, your server will generate an output with the default UTC time zone.
Fri Nov 20 13:55:20 UTC 2024
UTC is Coordinated Universal Time, the time at zero degrees longitude. While this may not reflect your current time zone, using Universal Time prevents confusion when your infrastructure spans multiple time zones.
If you want to change your time zone, however, you can use the timedatectl command.
First, run this command to generate a list of available time zones:
timedatectl list-timezones
A list of time zones will print to your screen. You can press SPACE to page down, and b to page up. Once you find the correct time zone, make note of it then type q to exit the list.
Next, you can set the time zone with timedatectl set-timezone by replacing the highlighted portion with the time zone you found in the list. You’ll need to use sudo with timedatectl to make this change:
sudo timedatectl set-timezone Asia/Kolkata.
You can verify your changes by running date again:
Fri Nov 20 13:57:20 IST 2024
The time zone abbreviation will reflect the newly chosen value.
Controlling timesyncd with timedatectl
most network time synchronization was handled by the Network Time Protocol daemon or ntpd. This service connects to a pool of other NTP servers that provide it with constant and accurate time updates.
But now with Ubuntu’s default install, you can use timesyncd instead of ntpd. timesyncd works similarly by connecting to the same time servers, but is llightweight and more closely integrated with systemd on Ubuntu.
You can query the status of timesyncd by running timedatectl with no arguments. You don’t need to use sudo in this case:
timedatectl
This command prints out the local time, universal time (which may be the same as local time, if you didn’t switch from the UTC time zone), and some network time status information. System clock synchronized: yes reflects that the time is successfully synced, and NTP service: active means that timesyncd is up and running.
If your output shows that NTP service isn’t active, turn it on with timedatectl:
sudo timedatectl set-ntp on
Switching to ntpd for Time Synchronization on Ubuntu
timesyncd will work in most circumstances. There are instances, however, when an application may be sensitive to any disturbance with time. In this case, ntpd is an alternative network time service you can use. ntpd uses sophisticated techniques to constantly and gradually keep the system time on track.
Before installing ntpd, you need to turn off timesyncd in order to prevent the two services from conflicting with one another. You can do this by disabling network time synchronization with the following command:
sudo timedatectl set-ntp no
Verify that time synchronization is disabled:
timedatectl
Check that your output reads NTP service: inactive.
This means timesyncd has stopped. Now you’re ready to install the ntp package with apt.
First, run apt update to refresh your local package index:
sudo apt update
Then, run apt install ntp to install this package:
sudo apt install ntp
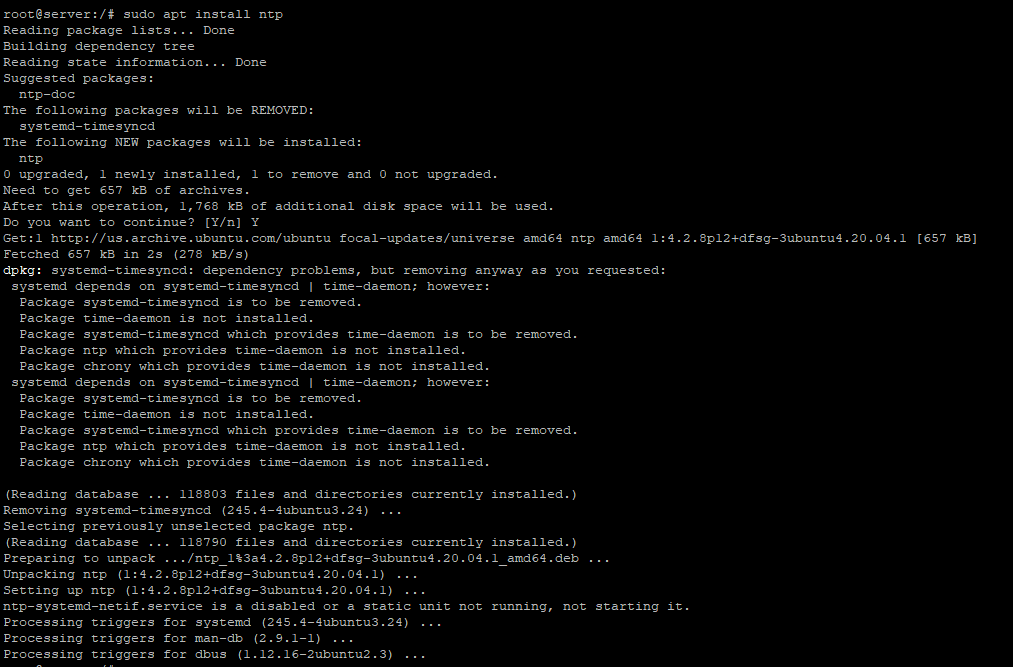
ntpd will begin automatically after your installation completes. You can verify that everything is working correctly by querying ntpd for status information:
ntpq -p
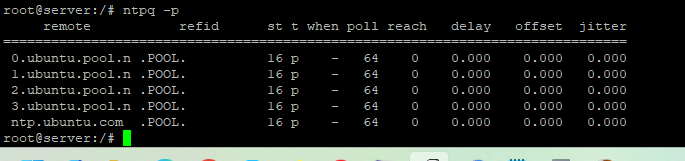
ntpq is a query tool for ntpd. The -p flag requests information about the NTP servers (or peers) ntpd is connected to. Your output will be slightly different but will list the default Ubuntu pool servers plus a few others. Remember, it can take a few minutes for ntpd to establish connections.
Conclusion
In this article, you’ve successfully viewed Time Synchronization on Ubuntu .The system time, changed time zones, worked with Ubuntu’s default timesyncd service, and installed ntpd. If you have advanced timekeeping needs, you can reference the official NTP documentation, and also take a look at the NTP Pool Project, a global group of volunteers providing much of the world’s NTP infrastructure.
